Showing posts with label crafting. Show all posts
11 May 2011
A New Take on Photo Gifts
Is there anything grandmas love more than pictures of grandkids?
For Mother's Day I usually give photo gifts to my mom and mother-in-law. This year I decided to change it up a bit and give silhouettes. I used the tutorial at Design Sponge and I love how they turned out!
Each of the girls also gave one of their own craft projects -- Ellie decorated the butterfly with glitter glue and AJ made a lily from construction paper and cardstock.
Linking up to Homemaker on a Dime's Creative Bloggers Party Hop , Get Your Craft On at Today's Creative Blog , Made by You Monday at Skip to My Lou , Lil Luna Link Party , Blue Cricket Designs Show & Tell Wednesday , What I Made Wednesday at Sweetpeas & Bumblebees , Tatertots & Jello's Weekend Wrap Up!
01 May 2011
Teacher Appreciation Gifts -- Fabric Flower Pen tutorial

This coming week is Teacher Appreciation Week at AJ and Ellie's school. Every year, each kid gets a paper lunch sack with a letter on it, and the gifts for both teachers must start with that letter *and* fit in the bag. Ellie's letter was "G" and AJ's was "Y." Not wanting to go with yo-yo's, Yoo-Hoo, yak figures, gum, grapes, or gimp lanyards, I decided to harness my current passion for making fabric flowers and give something useful, too. So AJ's teachers are getting 
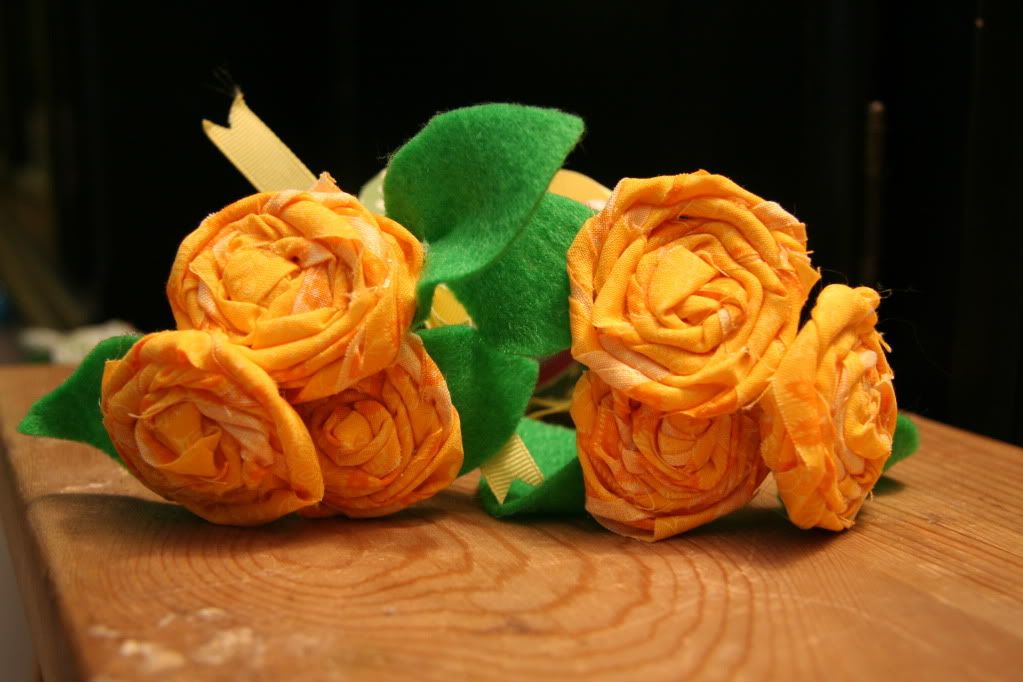
yellow flower pens/pencils, while Ellie's have a garden of many colors. (Stretching it? A bit. I think the cute makes up for it, though.)
Here's how I did it:
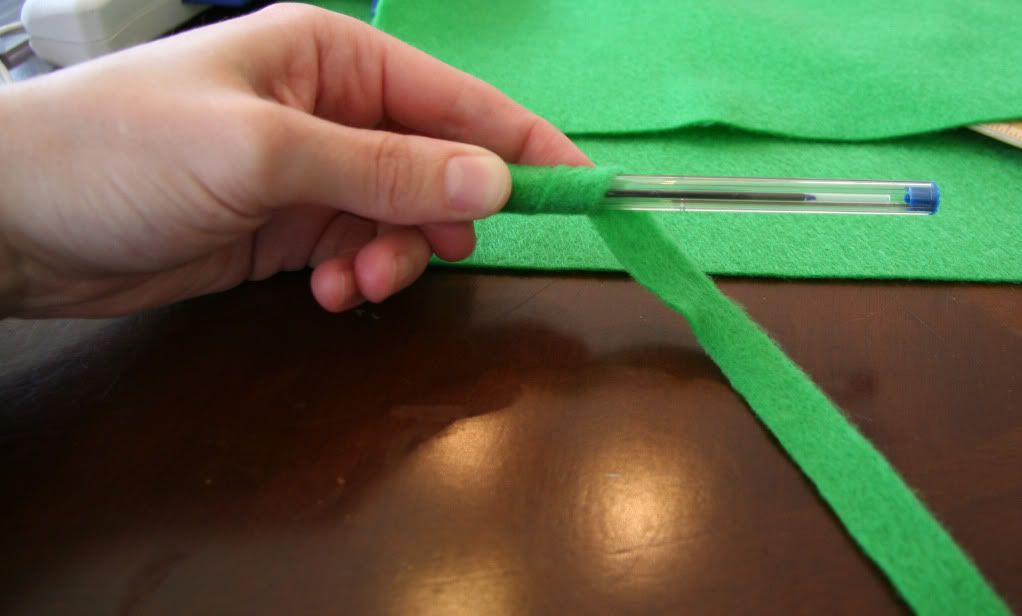
First, I cut 1/2" strips of green felt to wrap around the pen as the stem. I left enough room at the bottom to grip the pen normally; for the pencils, I wrapped to halfway down to leave room to sharpen. Attach with a bit of hot glue. At the top/eraser, I glued down the felt over the top to give the fabric flower a better surface to grip to.
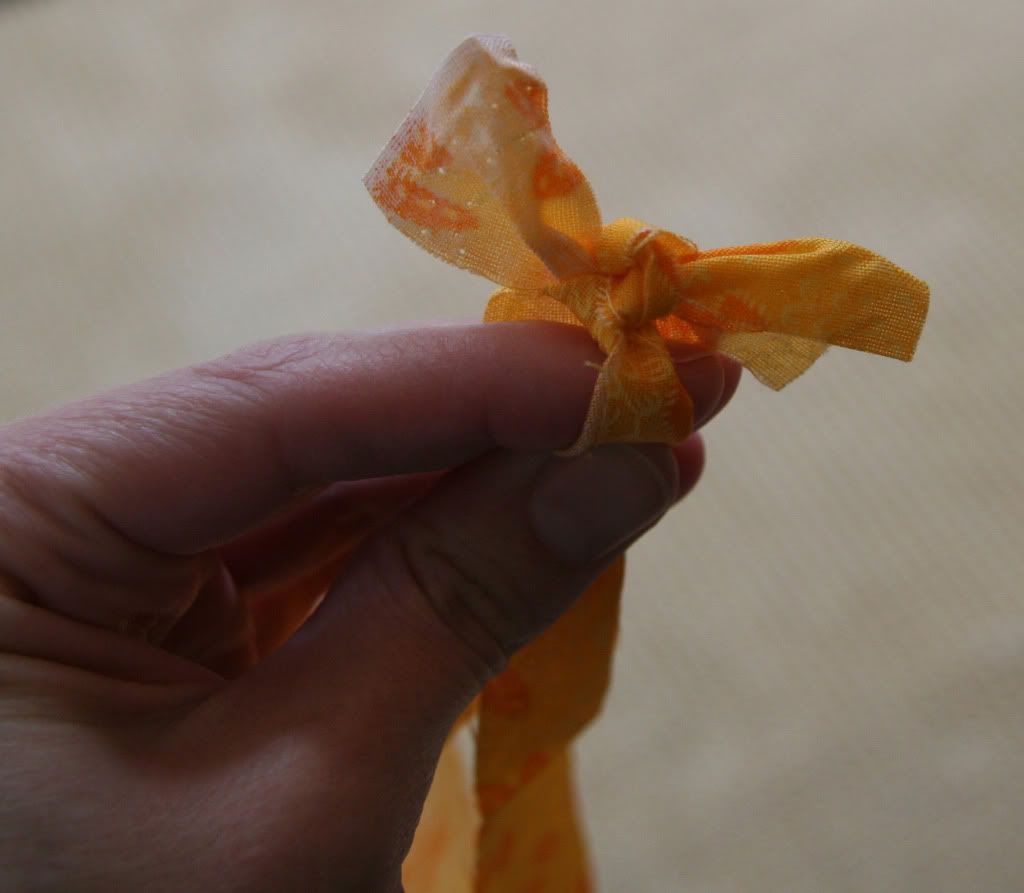
For the flowers, I used my rotary cutter to cut two strips for each bloom of various widths from fat quarters of quilting fabric -- up to 3/4" for the biggest flowers. Tie the strips into a knot, fold the top ends into the knot and secure with hot glue. I found that having a large center helped balance the flower on top of the pen, and helped in the next step of showing both sides of the fabric.
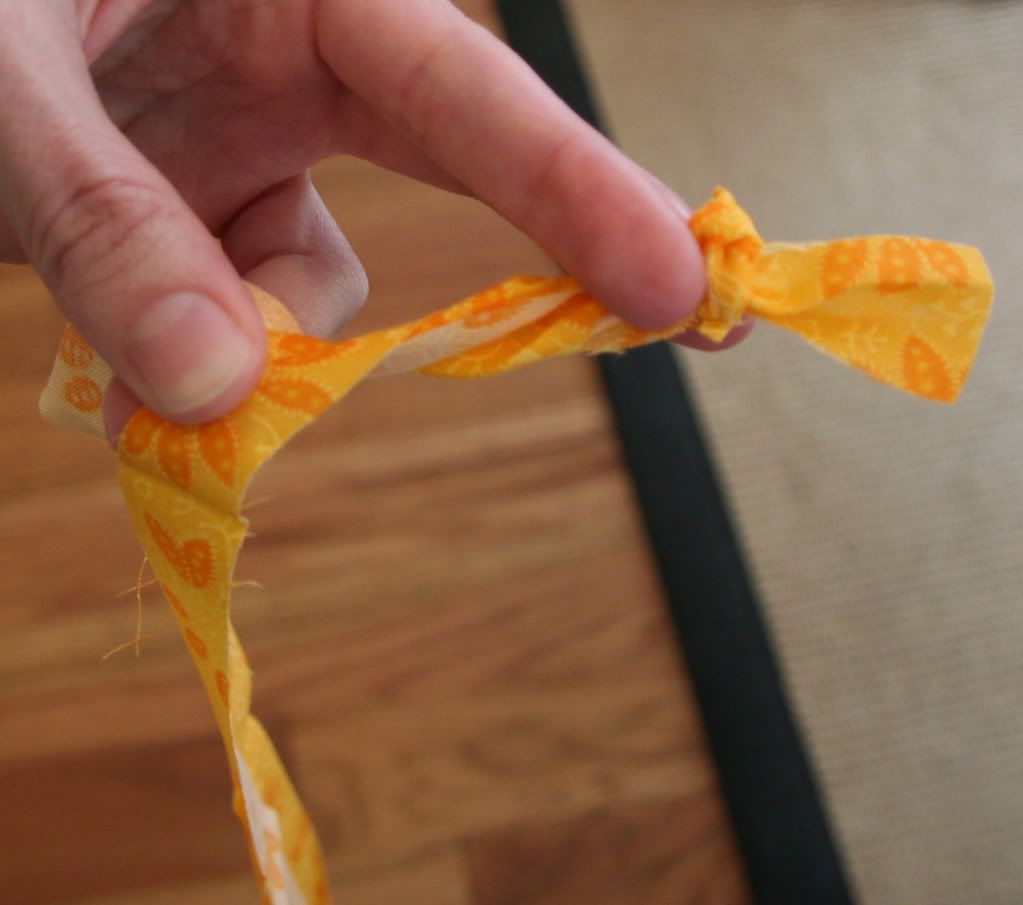
Now, twist the strips individually, then twist together and start wrapping the twisted strips around the center, hot gluing every so often to hold it together.
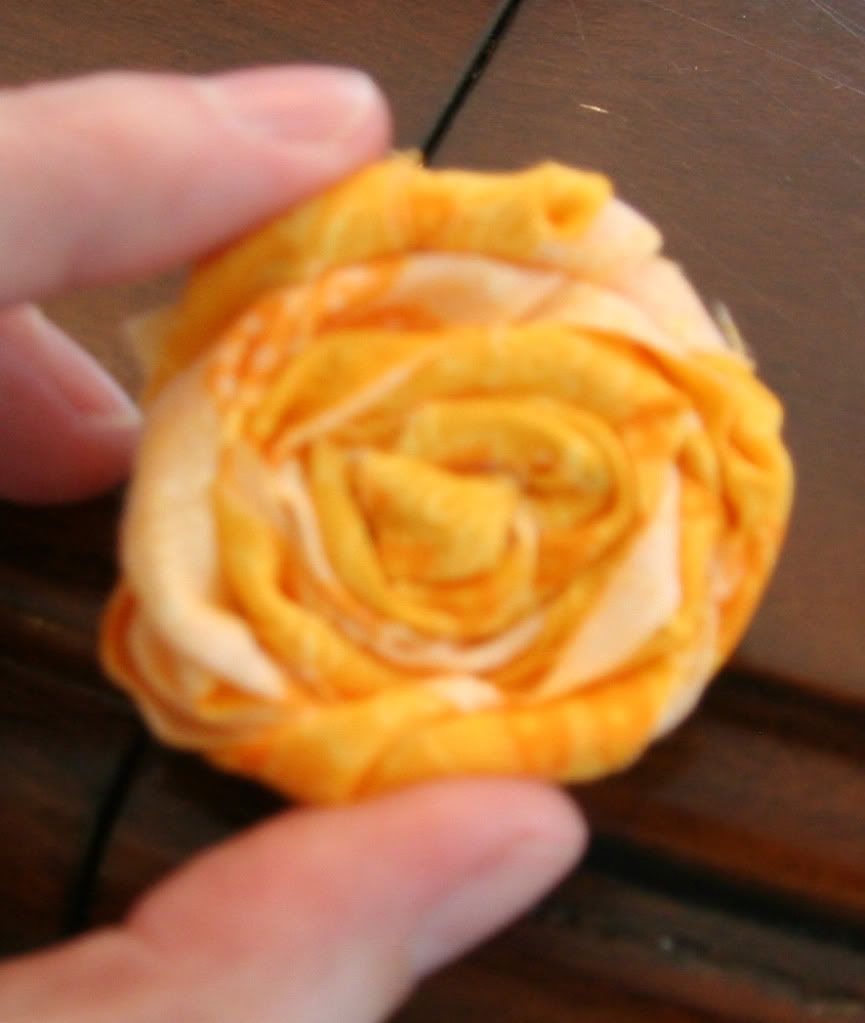
When you get to the end of the flower, glue the remaining "flap" down to the underside of your flower.
You can see how this method gives a very "shabby chic" sort of bloom, with lots of twists and texture.
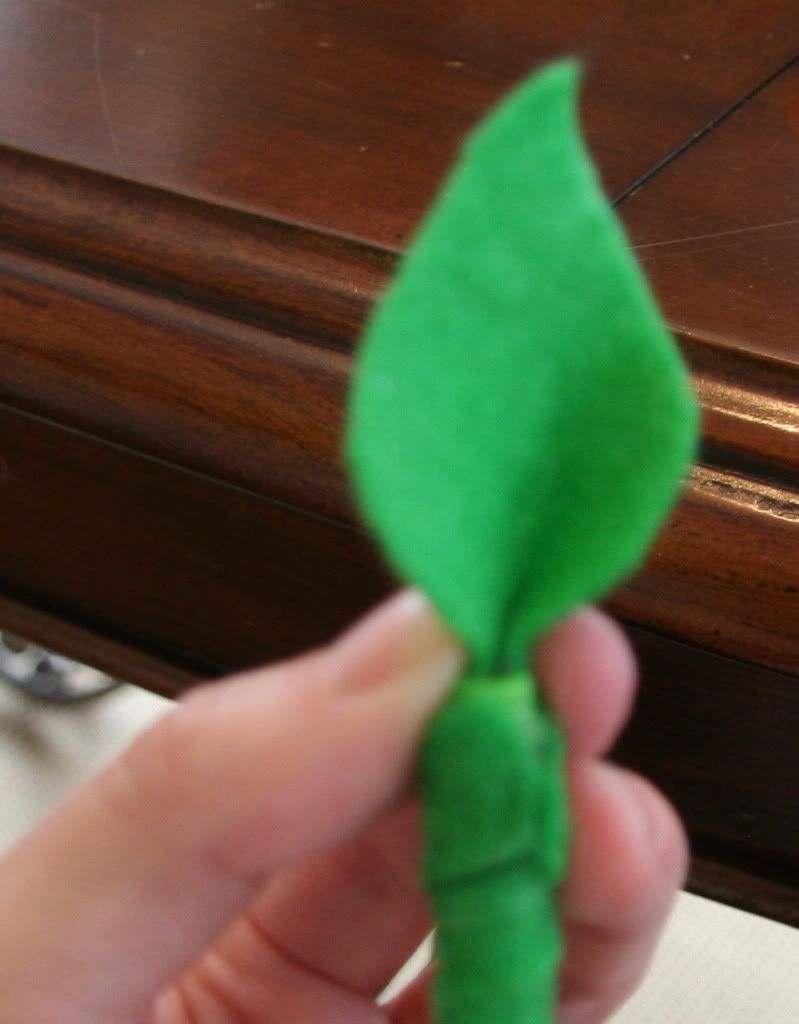
Next, I cut leaves from green felt, leaving a bit of a "stem" at the bottom, and glued it to the top of the pen.
Finally, glue the flower onto the top!
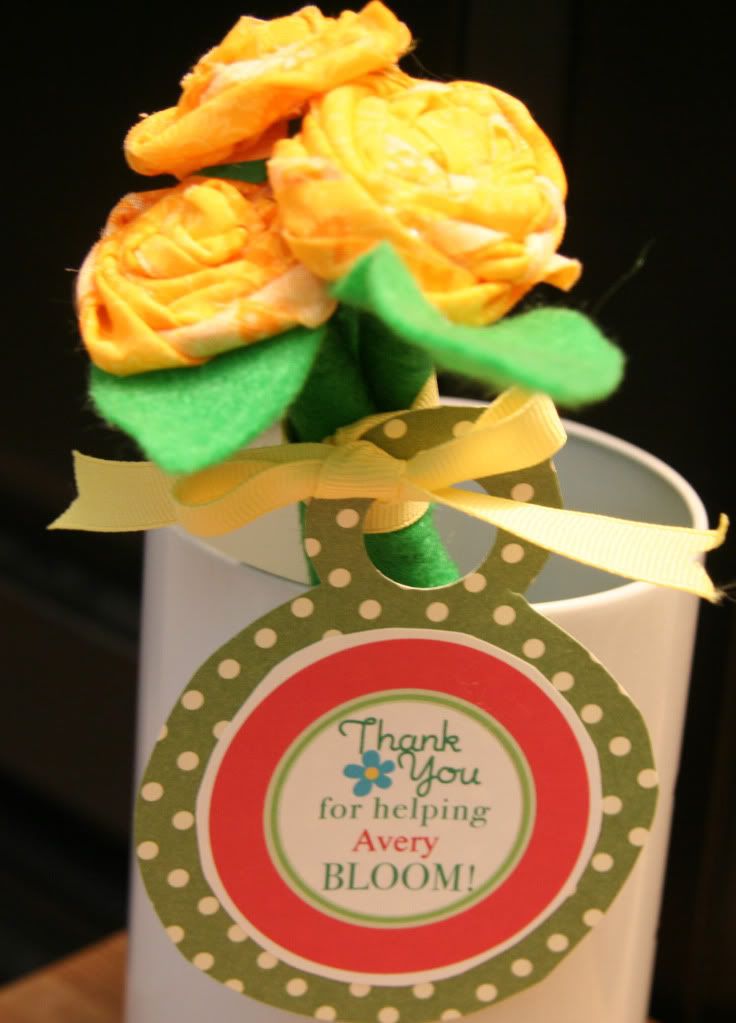
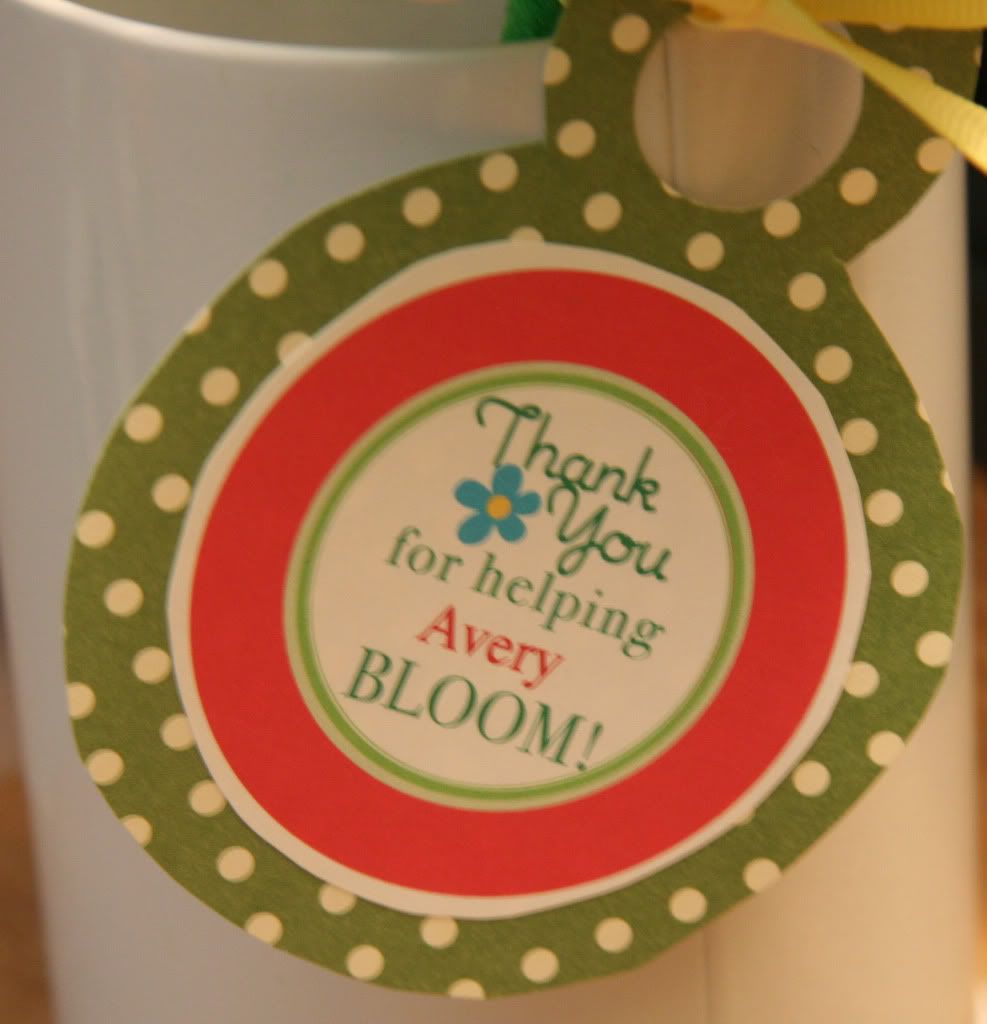
I grouped two pens and one pencil together for each teacher, and then tied the bundle with yellow ribbon. I printed out these adorable, edit-able tags that say "Thank You for Helping *Name* Bloom" from Skip to my Lou , glued them onto some scrapbook paper, and tied it on.
I'm really excited for the girls to give these "bouquets" to their teachers!
I'm linking up this post to Sew Darn Crafty at Sew Many Ways , Tatertots & Jello Weekend Wrap-Up , Whatcha Got Weekend at lollyjane boutique , Green Door Designs Saturday Spotlight , Think Pink Sunday at Flamingo Toes , the Monday link party at CraftOManiac , Made by You Monday at skiptomylou , Make Something Monday at Sarahndipities , Made with Love Mondays at SewChatty , Inspire Me Mondays at Homemaker in Heels , Show Me What You've Got at Not Just a Housewife , Handmade Tuesdays at Ladybug Blessings , Creative Juice Thursday at Momnivore's Dilemma , Sugar & Spice at seven thirty three , Get Your Brag On at Gluesticks and Get Your Craft On at Today's Creative Blog !
24 April 2011
Easter Run-Down
This Easter, we had a bit of ham, thanks to AJ.
Ellie, who is still not feeling 100% after being sick this week, provided some w(h)ine.
And Z just gave us his big sad face when he was more than a few inches away from Mama.
We did do a bit of crafting -- the girls cut out Easter eggs and butterflies from sheet foam and went to town with glitter glue and stickers, and I borrowed their thumbs to make "Hoppy Easter" cards (thanks for the inspiration, Sarahndipities !).
Hope everyone had a wonderful day!
I'm linking to Everything But the Kitchen Sink at A Little Knick Knack , Weekend Wrapup at Tatertots and Jello , What'cha Got Weekend at lollyjane boutique and Make Something Mondays at Sarahndipities today!
20 April 2011
Spring Crafty Show-Off
Inspired by the rest of the blogosphere, I decided the house needed a bit of "Spring-ing Up." This wreath is now hanging on the (always open) door to our basement.
Here's a close up of the fabric & felt flowers:
This was ridiculously easy to make! I picked up a straw wreath form at my local craft mecca and broke out the glue gun. I've seen some that used strips of burlap to cover the wreath, but craft mecca didn't have any, so I used similarly-textured brown ribbon and hot glued it in place.
Then came the fun part! There are lots of tutorials on how to make rolled fabric flowers and felt rosettes, I followed those and then clipped a few felt leaves. A few more dabs of hot glue, a ribbon to hang it, and now we have a little touch of spring!
I may or may not also now have an addiction to making these flowers. They're super cute -- they can fancy up jewelry, clothes, even a lampshade -- I'm thinking this would go so well in AJ's shabby-chic-ish bedroom.
I'm linking up this post to Wow Us Wednesday at Savvy Southern Style , Nifty Thrifty Tuesday at Coastal Charm , What I Made Wednesday at SweetPeas & Bumblebees, Catch a Glimpse Thursday at A Glimpse Inside , Handmade Tuesday at Ladybug Blessings , Saturday Spotlight at Green Door Designs and Creative Juice Thursdays at Momnivore's Dilemma. I'd love to know what you think!
Subscribe to:
Posts (Atom)